|
|
|
Shutter Speed
( Using shutter speed for dramatic effects )
Printer Friendly Version
Something you might ask yourself is why do I need to worry about shutter speed. Shutter speed is critical to taking a great picture.
Yes anyone can let the camera do the work for you. Although it is neat to create works of art with your photos. This is what we are
going to focus on today. Is how to create that work of art with your camera and adjusting your shutter speed.
There are many factors of taking a great photo. In this tutorial we will cover some basics about shutter speed and how to create that
picture you always wondered how did they do that.
To understand shutter speed a bit more I will explain a few things here. Your shutter speed is critical in freezing objects in motion.
When snapping a picture of something in motion, you may want to freeze that object or person in time. So it's important to set your
shutter speed to a fast enough speed to achieve this. Now in some cases you may want to show your object or person in motion. To do
this you will need to slow your shutter speed down a bit. Slowing your shutter speed down will create a blur effect to your subject.
This can be a neat effect depending on what your trying to achieve while taking your picture.
Shutter speed is measured in seconds. For instance if you looked into your
camera and look at the settings below it might read 125 for your shutter
speed. This means your shutter will open for 1/125 of a second and close.
At that speed you can take some really nice pictures. Although sometimes
you might need a faster shutter speed than that. Lets say your in a moving
car and want to take a picture of something coming up along the road, and
your traveling at a speed of 65mph. You will want to set your shutter speed
at or above 800. This means your shutter will open for 1/800 of a second
and close. Now that's fast. You should be able to get your picture almost
perfect at that speed.
Lighting does play an important roll in this too. If there is not much light you will not be able to set your shutter speed to 800 without
underexposing your picture. Also you don't want to set your shutter speed so slow that you overexpose your picture either. I will
go into greater detail about exposure in a later tutorial.
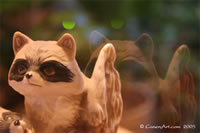
Lets say you want to give motion to an object that can't move on its' own. Here is a few ways of doing it. In this first example I have
taken a little figurine and I want to make it look like it has moved across the picture. What I have done is slowed my shutter speed down to
4 seconds. Now you may be wondering 4 seconds. What would that look like in the camera? Remember above how we was talking about the speed
being 1/125 of a second. Now we are going to shot at 4 seconds. In the camera it will have a quote mark beside the number. Here is what it
will look like: 4" . The " stands for full seconds. Four seconds is a long time when taking a picture. The lighting has to be right so
we don't overexpose our picture either. In this example below I used a tripod with the camera and left my adjustment to turn the camera
side to side loose, so that I could create the motion in the picture.
Example:
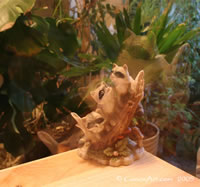
In this next example I wanted to give my subject the illusion of having a silhouette. The way I created this look is I started out zoomed in
on the figurine and then I zoomed out and left it for the reminder of time. I set the shutter speed to 6 seconds in this picture. So as soon as
I snapped the picture, I zoomed out right away and then left the camera alone until the shutter closed. Here is the effect I got.
Example:
Water is a fun one to play with the shutter speed on. You can create a soft
flowing look to the water simply by slowing the shutter speed down. Now
here is a couple of examples below with water. In this first example I have
taken two pictures of the same spot to show you the comparison. This first
shot I set the shutter speed at 45. This means the cameras shutter will
open for 1/45 of a second. This is not very fast, but in this picture there
was low lighting. So to get a good picture without underexposing the film
I couldn't shot at any faster of a speed. You will notice the water is frozen
almost where it was at that second. You can see a little bit of motion in
the picture, but in the following example you will really notice it.
Example:
This is the same picture but the shutter speed was set to 2 seconds to create this look. Personally I really like photos like this. It creates a soft
look to the water. It takes a raging river and makes it almost look soft. Remember 2 seconds in your camera will look like this: 2"
Example:
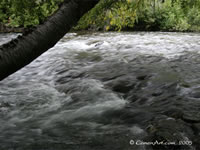
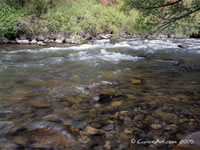
Here is the last example of shutter speed. In this photo I was able to set the shutter speed at 60. In this photo you can notice the rapids a little better.
They stand out a little better because I was able to shot it at a higher shutter speed than the previous picture.
Example:
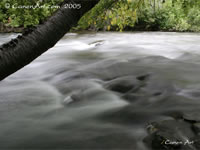
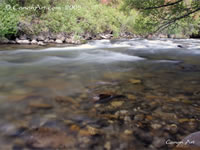
This photo is the same as the previous picture. Now we have slowed the shutter speed down to 1.3 seconds. In your camera it will look like this: 1"3
You will like the effect this will give to this photo. I love the way the rocks show threw the water.
Example:
This concludes our tutorial on shutter speed. I really hope this helps everyone understand how to take a few different types pictures simply by adjusting
your shutter speed.
|
^ Return to Top ^
|
|


